Bounce rate is one of the key metrics to determine the quality of the website traffic and the performance of your content.
As bloggers, we worry about the high bounce rate in our Google Analytics dashboard. And it is one of the frequent queries I encounter from new bloggers.
“My blog’s bounce rate is too high, how do I deal with it?”.
Below is the Google Analytics dashboard screenshot shared by a blogger with a similar problem.
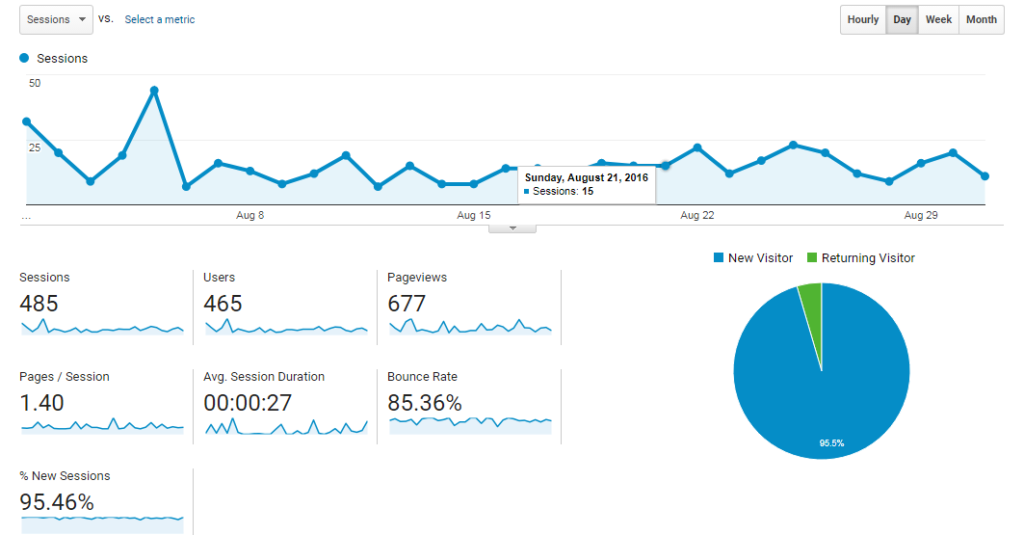
You can see that the average session duration is only 27 seconds and the bounce rate is 85.36%. But most of the time these bounces are not bounces at all.
If you are facing the high bounce rate issue in your analytics tool dashboard too, read on. In this post, I share with you one of the common reasons for high bounce rates and how to avoid them.
But, before finding the causes for a high bounce rate, let’s understand what bounce rate is.
What Is Bounce Rate In Google Analytics?
Bounce Rate is the percentage of single-page sessions (i.e. sessions in which the person left your site from the entrance page without interacting with the page).
Most of the time, a user bounces back from your website if they didn’t find your content as informative/useful/relevant to them.
But you should understand that a high bounce rate not only occurs because of your content, but it might also have to do with something about how the bounce rate is calculated technically. Consider the following situations.
Scenario 1: A user lands on one of your blog posts, reads the whole article, and leaves your site.
Scenario 2: A user visits any of your product pages and places an order over the phone.
Both the above cases are not exactly bounced, but according to the standard definition of bounce rate, they are considered as bounces since the users had visited only one page and left the site. Such miscalculations result in a high bounce rate.
What’s the solution to this problem? Adjusted Bounce Rate!
What is the Adjusted Bounce Rate (ABR)?
Adjusted Bounce Rate (ABR) is calculated by tweaking the actual Google Analytics tracking code and sending an event based on the time spent on the page.
For example, trigger an event if a user spends a minimum of 30 secs (customize the time based on your website) on a page. This event will be considered interaction with a website. Even if the user doesn’t visit the next page, it won’t be counted as a bounce.
[Tweet “Why is adjusted bounce rate important? Because you cannot make better decisions with wrong data.”]
How to set up Adjusted Bounce Rate (ABR) in Google Analytics
Plain code
If you have added Google Analytics code manually, simply add the following code to your Google Analytics tracking code.
setTimeout(ga('send','event','adjusted bounce rate','30 seconds'),30000);
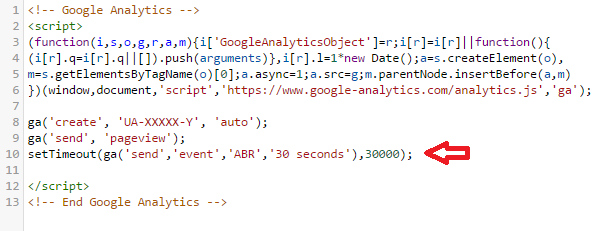
The above code will trigger an event after 30 seconds (30000 milliseconds). You can change this based on your requirement.
Using a WordPress plugin
Adjusted Bounce Rate WordPress plugin makes it easy to implement the adjusted bounce rate in WordPress websites.
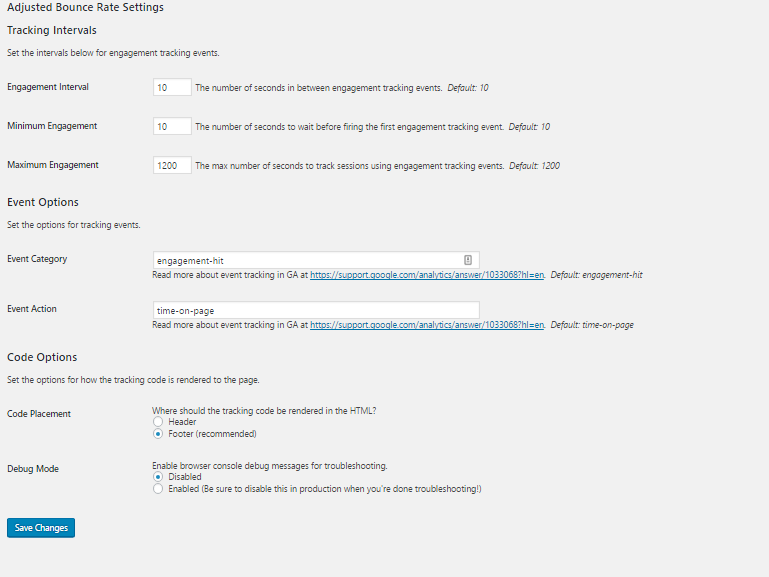
After you install the plugin, you can find Adjusted bounce rate settings under the Settings menu. You can specify when to fire the event and event names in the settings.
Minimum Engagement – The number of seconds to wait before firing the first engagement. ( Typically 30 secs, you can decide this based on your site)
Engagement Interval – These events will fire for every specified time.
Maximum Engagement – The maximum number of seconds to track these events.
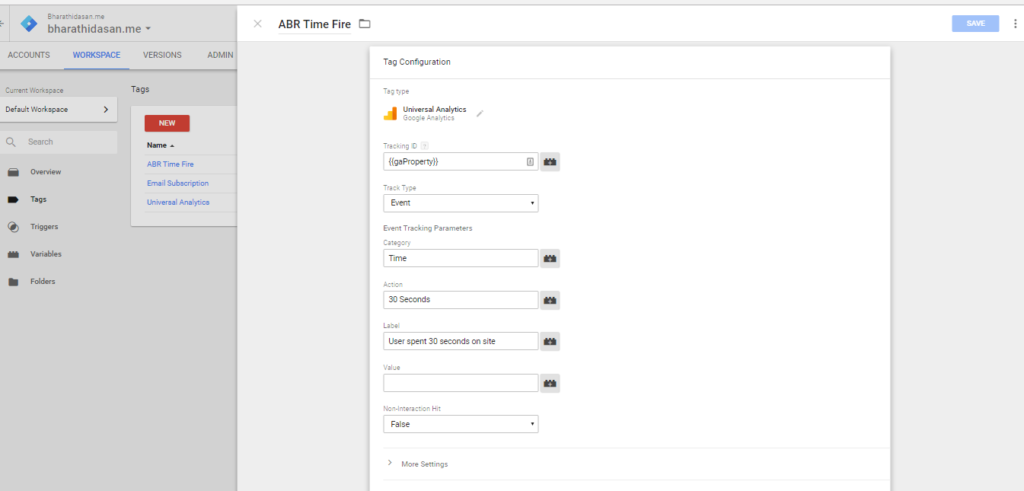
Adjusted Bounce Rate using Google Tag Manager
If you are using Google Tag Manager to manage all your tags, you can create a tag to fire an event after a specified time. Here’s how you do this.
Click on create new Google Analytics tag, choose the track type as an event then specify the event category, type, and event label.
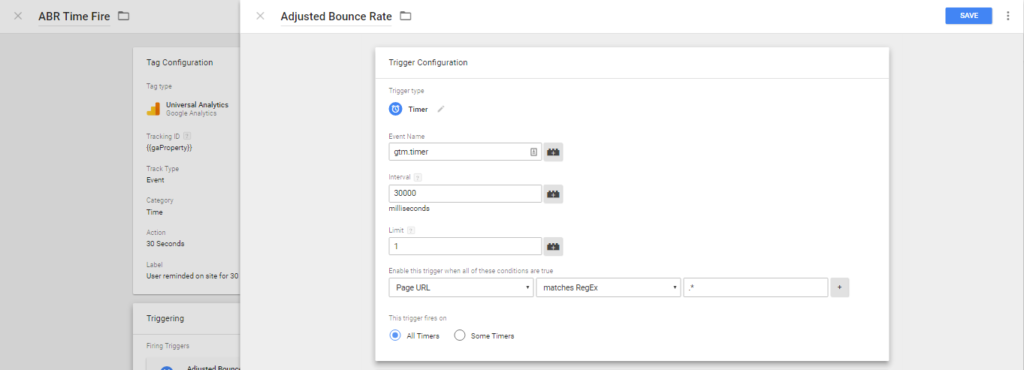
Once you create the tag, you have to configure time as the triggering point. Choose the trigger type as a timer. And enter the time interval you need this event to trigger in and choose the web pages.
You can check this in preview mode to see if the event gets triggered at the specified time.
Conclusion
You can check the impact of the Adjusted bounce rate in the below screenshot.
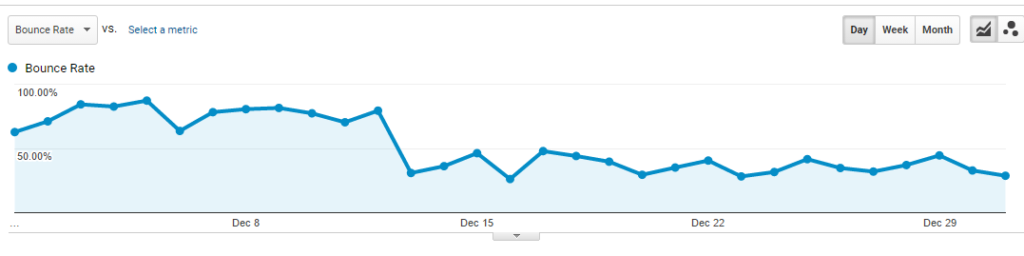
Implementing an Adjusted bounce rate is not the only solution for your high bounce rate problem. However, it provides you with an improved version of the standard bounce rate. And it also gives you a clear idea of how your visitors interact with your website.
I hope you have now learned how to adjust the bounce rate for your site. If you have any queries regarding this or would like to share your suggestions and feedback, do comment below!